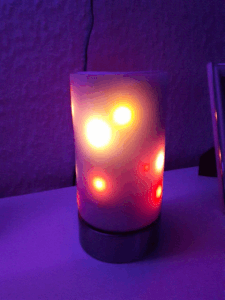
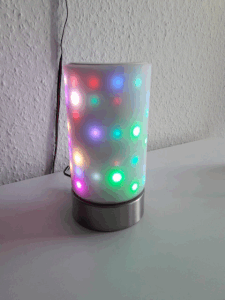
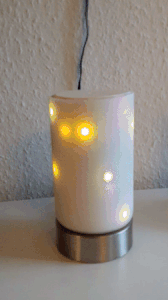
Based upon doctormord's great mixture, this software is intended to act as a full-featured WiFi-LED-Strip-Controller for WS2812B-LEDs. I added some new effects to doctormord's work and integrated Aaron Liddiment's Matrix and Text-Libs to implement a nice, NTP-driven clock. As a prove of concept I finally build a decent RGB-LED-Lamp (milk glass / 11x8 LEDs) with it:

- Runs on an ESP8266 (I used a NodeMCU-board with an ESP-12E).
- Easy integration into your existing WiFi network.
- Max. power consumption can be defined (
#define MAX_CURRENT): Protects your power supply by cutting brightness if current draw exceeds configured value. - Responsive user interface which can be used with any desktop or mobile web browser.
- Static color can be selected with a decent, delay-free colorwheel.
- Many different effect-modes which can be tweaked and customized. They look great on both strips and matrices.
- Customizable scrolling NTP-driven clock (only useful on a matrix with a minimum height of 7 pixel). Can be combined with the other effects.
- Customizable scrolling text (only useful on a matrix with a minimum height of 7 pixel). Can be combined with the other effects.
- API to integrate the controller in existing home automation environments.
- Firmware upgradeable via web interface.
- Debug-Output can be viewed via telnet session.
- Please use v2.5.0 of the ESP8266 Board in the Arduino IDE.
- Fork of FastLED 3.1.3 library (included in this repo: see libraries-folder!).
We are using this fork because it supports DMA which removes flicker issues. Enabled via
#define FASTLED_ESP8266_DMA. You must use pin 3 for your LED stripe! - RemoteDebug: Debug output is visible via a telnet session rather than printing to serial). Please use v2.0.0!
- LEDMatrix by Aaron Liddiment (included in this repo: see libraries-folder!).
- LEDText by Aaron Liddiment (included in this repo: see libraries-folder!).
- NTPClient
- WebSockets: Please use v2.0.0 / v2.0.1
- WifiManager: Please use v0.13.0
- Wire your LEDs to your controller: In order to use the highly prefered DMA-Mode, you must use GPIO3 (RX on a NodeMCU) as the DATA_PIN!
- Copy libraries from the
libraries-folder in this repo to your arduino libraries-folder and make sure your have the other needed libraries added via your Arduino IDE as well. - Configure the Arduino IDE to communicate with the ESP8266. Or export the bin file from the IDE and use your favourite flashing tool instead.
- Compile and upload the sketch (from this repo). The sketch is setup for a 88 pixel WS2812B GRB LED Strip on pin 3 with DMA enabled. Matrix is configured
as a vertical 11x8 (width x height) layout with the beginning at bottom right (change the applicable options in
hardware.hto your desire). - On first launch, the ESP8266 will advertise it's own WiFi network for you to connect to. Once you connect to it, launch your browser and the web interface is self explanatory. (If the interface doesn't load, type in "192.168.4.1" into your browser and hit go).
- Once the ESP is on your wifi network, you can then upload the required files for the web interface by typing the IP address
of the ESP followed by
/upload(i.e.192.168.1.20/upload). Then upload the files from the folder labeledupload these to ESP8266from this repo. - Once you have finished uploading, type in the IP of the ESP into your browser and you should be up and running!
- You can edit the location string shown in the web ui by editing the file
location.txtbefore you upload it. Or edit the file afterwards by typing the IP address of the ESP followed by/edit(i.e.192.168.1.20/edit) using the integrated ESP Editor (should be used with Google Chrome).
After the first flash, you can update the firmware via OTA by typing the IP address of the ESP followed by /update (i.e. 192.168.1.20/update).
WiFi config, settings and uploaded files will stay untouched.
/upload: Upload files to SPIFFS-filesystem (used to upload/update web ui)/update: Upload new firmware here (web ui and settings will be kept)./edit: Edit/upload files on the SPIFFS filesystem./graphs.htm: Some statistic graphs of system ressources./restart: Reboot the system (make sure to save changed settings before!)./reset_wlan: Delete the wifi settings (system will come up with the default WiFi configuration ap to connect to).
/set_brightness: Set overall brightness. Possible parameters: Brightness in percentc=(0-100)or absolute brightnessp=(0-255)./set_clock_brightness: Set brightness of the clock. Possible parameters: Brightness in percentc=(0-100)or absolute brightnessp=(0-255)./set_clock: Show clock. Possible parameters: Turn ons=1(clock runs immediately) or turn offs=0./set_text: Show text. Possible parameters: Turn ons=1(text runs immediately) or turn offs=0./set_text_brightness: Set brightness of the scrolling text. Possible parameters: Brightness in percentc=(0-100)or absolute brightnessp=(0-255)./update_text: Updates custom scrolling text and display it once. Parameters:text=(Max. 255 chars of text)and (optional)color=(0-6)./get_brightness: Returns the current overall brightness in percent./get_clock_brightness: Returns the current brightness of the clock in percent./get_text_brightness: Returns the current brightness of the scrolling text in percent./get_switch: Returns0if current mode isOFF, otherwise1./get_color: Returns the current main color in HEX./status: Returns JSON of current settings./restore_defaults: Restores default effect settings./load_settings: Load effect settings from memory./save_settings: Save current effect settings to memory.
/off: OFF (even glitter, clock and text are disabled)/all: SOLID COLOR (set color via additional parameter:rgb=#COLORHEXVALUEorr=0-255,g=0-255,b=0-255)/rainbow: RAINBOW/confetti: CONFETTI/sinelon: SINELON/juggle: JUGGLE/bpm: BPM/ripple: RIPPLE/comet: COMET/wipe: WIPE/tv: TV/fire: FIRE/frainbow: FIRE RAINBOW/fworks: FIREWORKS/fwsingle: FIREWORKS SINGLE/fwrainbow: FIREWORKS RAINBOW/colorflow: COLORFLOW/caleidoscope1: CALEIDOSCOPE 1/caleidoscope2: CALEIDOSCOPE 2/caleidoscope3: CALEIDOSCOPE 3/caleidoscope4: CALEIDOSCOPE 4/blank: BLANK (same as OFF but with glitter, clock and text enabled)
This project is released under the GNU LESSER GENERAL PUBLIC LICENSE Version 3, 29 June 2007.
Griswold is free software: you can redistribute it and/or modify
it under the terms of the GNU Lesser General Public License as
published by the Free Software Foundation, either version 3 of
the License, or (at your option) any later version.

This program is distributed in the hope that it will be useful,
but WITHOUT ANY WARRANTY; without even the implied warranty of
MERCHANTABILITY or FITNESS FOR A PARTICULAR PURPOSE.  See the
GNU General Public License for more details.

You should have received a copy of the GNU Lesser General Public License
along with this program.  If not, see <http://www.gnu.org/licenses/>.